SSL Communications for Netcool/OMNIbus
Security for the network communications between the various OMNIbus clients and the ObjectServers can vary from non- existent, to user/password authentication to SSL based connections, optionally with FIPS 140-2 compliance. The complexity of the set-up of the SSL deters many administrators from implementing such secure communications. This article attempts to explain the basics of the SSL communications and how they apply to the Netcool/OMNIbus components.
This article is targeted at those familiar with the Netcool/OMNIbus components but not secure communications or SSL.
SSL Basics
It helps to understand the basics of the SSL protocol before attempting to configure SLL communications for Netcool/OMNIbus. There are two key parts to the SSL security, firstly verifying the identity of the server (does the client trust the server?) and secondly encryption of the data.
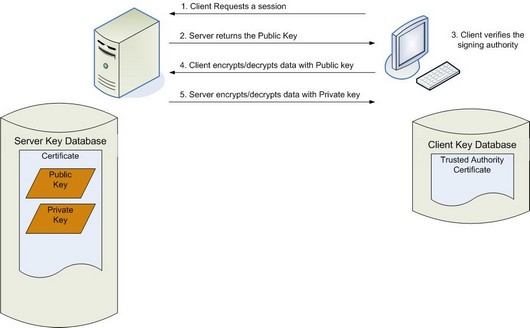
Consider a generic client server connection over SSL. The basic session set-up is as follows:
- The client initiates the connection to the server
- The server returns a Public Key to the client
- The client verifies the Certificate Authority, or CA, that signed the Public Key is trusted
- If the client trusts the CA, then it will commence communications using the Public Key for data encryption/decryption
- The server will use the Private Key for subsequent data encryption/decryption
This process includes the server identification, verifying the CA is a trusted authority, plus data encryption using the public/private key. So how is this data structured?
Both server and client maintain a key store, or key database. The server key store includes the Certificate Authority signed Public and Private keys. The client key database includes the trusted authority certificate. i.e. of the signing authority. The session flow and key databases are demonstrated in figure 1, below.
Figure 1: SSL session initiation and associated key databases
OMNIbus Configuration for SSL
So how does the theory apply to OMNIbus? In an OMNIbus set-up the server referenced above is the ObjectServer and the client could be a probe, Gateway, WebGUI or the native desktop. Hence, the steps for configuration are as follows:
- Configure the ObjectServer for SSL
- Create the server signed public/private keys and import into the server key store
- Configure the client to communicate using SSL
- Import the Authority Certificate into the client key store
To demonstrate how the SSL concepts apply to a Netcool/OMNIbus set-up, we will consider a standard virtual ObjectServer pair (PRIMARY and BACKUP) that are to be configured for exclusively SSL communications. The services are running on hosts with hostnames P01 and B01 respectively.
Configure the ObjectServer for SSL
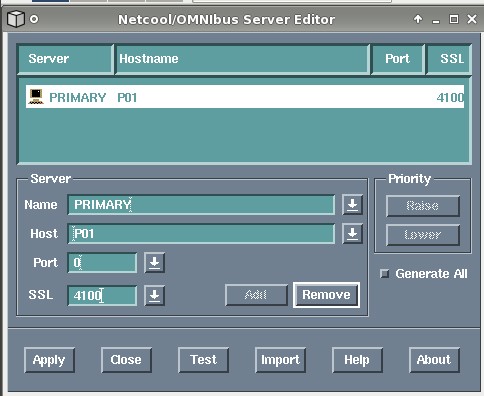
This step is a relatively simple update to the interface file. For each entry in the nco_xigen utility, it is possible to specify values for a Port and/or SSL property. Both are effectively listening ports, the former insecure the latter secure through the enforcement of SSL. Setting either of these to a value of 0 disables that function. For example, for an ObjectServer to accept SSL connections on port 4100 and reject all insecure sessions, set the value of Port to 0 and SSL to 4100. The table below demonstrates various configuration values for the combinations of secure and/or insecure communications.
| Communications Accepted | Port | SSL |
| Insecure only | 4100 | 0 |
| Secure Only | 0 | 4100 |
| Insecure and secure | 4100 | 4200 |
For our example, the second option is required for the PRIMARY and BACKUP ObjectServer configurations. The Server Editor configuration for the PRIMARY ObjectServer is demonstrated in figure 2 below.
Figure 2: PRIMARY ObjectServer interface definition
Create the Server Keys
This is the most complex step, especially for those more familiar with Netcool products than the SSL protocol. The Netcool suite ships with Global Security Tool Kit (GSKit) and the iKeyman tools for creating and maintaining the key store. This article will focus on the command-line tool for managing the key database for the OMNIbus components.
To create and populate the ObjectServer key store requires multiple steps.
- Create the key store
- Create a CA Certificate
- Create the ObjectServer keys
- Sign the keys
- Import the signed key into the key store
The following commands can be used on the PRIMARY ObjectServer for the above steps, assuming the PATH environment variable include $OMNIHOME/bin and $NCHOME/bin:
export KEYSTORE=$NCHOME/etc/security/keys/omni.kdb
cd $NCHOME/etc/security/keys
nc_gskcmd –KEYSTORE –create –db $KEYSTORE –pw orbdata –stash
nc_gskcmd –cert –create –db $KEYSTORE –pw orbdata –label P01CA –dn “C=UK,ST=BUCKS,L=Burnham,O=Orb Data,OU=Systems Management,CN=P01” –size 2048 –expire 3650 –ca true
nc_gskcmd –certreq –create –db $KEYSTORE –pw orbdata –label PRIMARY –dn “C=UK,ST=BUCKS,L=Burnham,O=Orb Data,OU=Systems Management,CN=VIRTUAL” –size 2048 –file PRIMARY_certreq.arm
nc_gskcmd –cert –sign–db $KEYSTORE –pw orbdata –label P01CA –target PRIMARY_cert.arm –expire 1000 –file PRIMARY_certreq.arm
nc_gskcmd –cert –receive –file PRIMARY_cert.arm –db $KEYSTORE –pw orbdata
Once restarted, the ObjectServer will only accept secure, SSL, communications. Equivalent steps will need to be completed on the backup ObjectServer.
Note: iKeyman is a GUI interface that can be used for the majority of the above steps. To start the GUI interface run nc_ikeyman. You will need to open the omni.kdb key store to view the certificates loaded above.
Configure the clients to communicate using SSL
Once the ObjectServer has been configured to receive SSL communications, the distributed clients will need to be configured to initiate SSL communications, and recognise the server signing authority as trusted. The concept for the client set-up is common for probes, gateways and the native desktop.
- Configure the interface for the VIRTUAL ObjectServer
- Extract the signing trusted authority certificate from the server (for a self-signed certificate)
- Create the client Key Store and import the trusted authority (for a self-signed certificate)
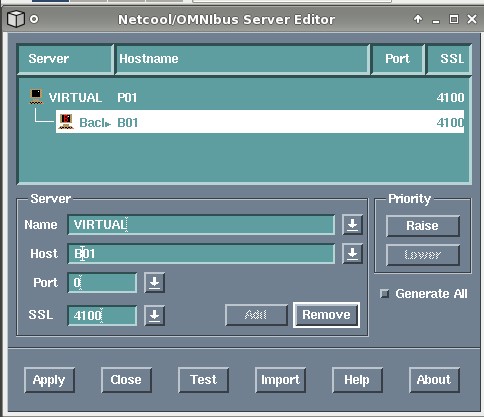
Configuring the virtual ObjectServer interface entry for the clients is a standard process. In the Server Editor tool the alias for the virtual ObjectServer is entered twice but with differing values for host/port/SSL, as appropriate. The figure below demonstrates the entry client entry.
Figure 3: Client interface entry
To extract the Trusted Authority certificate from the server, run the commands:
export KEYSTORE=$NCHOME/etc/security/keys/omni.kdb
cd $NCHOME/etc/security/keys
nc_gskcmd –cert –extract –db $KEYSTORE –pw orbdata –label PO1CA –target P01CA_trusted.arm
The file certificate created during the extract, $NCHOME/etc/security/keys/P01CA_trusted.arm, must be copied to the client using whatever options are vailable, for example scp or ftp.
On the client, a key store must be created and the Trusted Authority Certificate imported:
export KEYSTORE=$NCHOME/etc/security/keys/omni.kdb
cd $NCHOME/etc/security/keys
nc_gskcmd –KEYSTORE –create –db $KEYSTORE –pw orbdata –stash
nc_gskcmd –cert –add –file P01CA_trusted.arm -label TinyCA -db $KEYSTORE –pw orbdata
At this point the native desktop would connect successfully to the ObjectServer pair (assuming a relevant userid/password is supplied). Other clients, i.e. probes and gateways, will require the SSL Common Name to be defined within their relevant properties file. In the Example, the common name “VIRTUAL” was defined when creating the keys. The table below identifies the property name that must be configured for the different OMNIbus components.
| Component | Property Setting | Comment |
| Probe | SSLServerCommonName: ‘VIRTUAL’ | |
| Uni-directional Gateway | Gate.Reader.CommonNames: ‘VIRTUAL’
Gate.Writer.CommonNames: ‘VIRTUAL’ |
Only one of these will be required, dependent on the set-up of the source and target (reader and writer) ObjectServers |
| Bi-directional gateway | Gate.ObjectServerA.CommonNames: ‘VIRTUAL’
Gate.ObjectServerB.CommonNames: ‘VIRTUAL’ |
Ensure the PRIMARY and BACKUP ObjectServer are referenced individually in the interface file where the bi-directional gateway is running. |
Restart the probe or gateway for the property changes to take affect, and test the connection.
Note: The WebGUI will also require configuration for SSL. This will be discussed at a later date
Conclusions
SSL communications do have a performance impact on the servers as data must be encrypted and decrypted by both servers and clients. However, the level of security is many times greater than standard user/password authentication and FIPS 140-2 compliance can optionally be configured.
It is possible to target specific communications channels for SSL, for example, exclusively encrypt communications from a probe in a DMZ to the ObjectServer, leaving all other communications unencrypted. Such decisions need to be based on your network architecture and business security requirements.
Finally, don’t forget to use appropriate file system security to protect the key store and certfticates.
Views: 899


